Rank on Google Automatically
Get Organic Traffic Without Hiring Writers
Our Tool Will Create Blog Posts & Rank + Index Them On Google 100% Fully Autopilot.
- Write, Schedule And Rank Blog Posts Daily
- Human-like Content, Written by AI
- Watch Your Rankings Climb Every Month!


Over 600+ Websites Using Auto Page Rank!
Proof That Our Software Works
HeroicShorts.com - From 0 To 300 Keywords Ranked In 3 Months
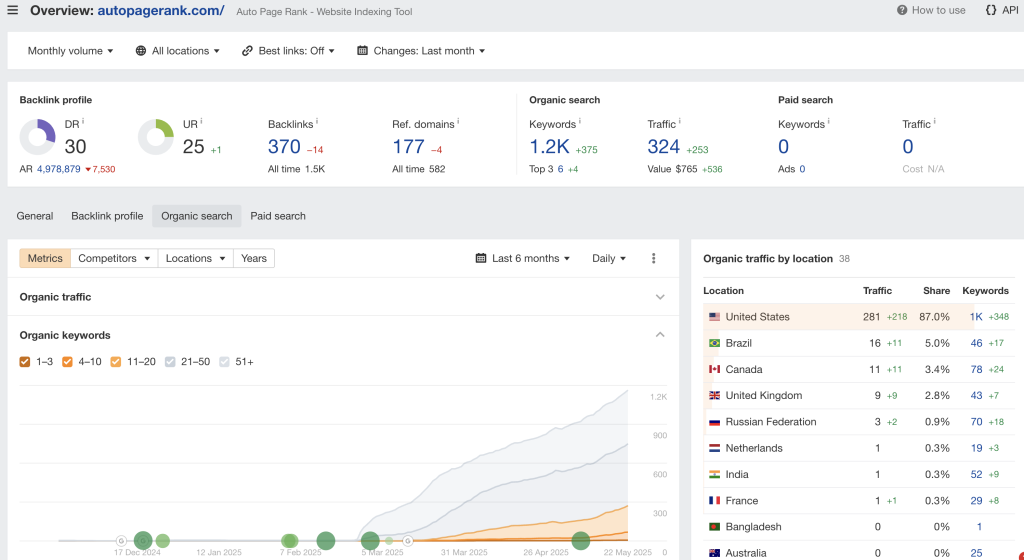
AutoPageRank.com - From 0 To 1,200 Keywords Ranked In 3 Months
StealthAgents.com - Over 541,000+ Oragnic Clicks Generated

Automate Your SEO Rankings
Auto Page Rank helps you create human-like content for your websites on 100% autopilot.
It’s the only software that will create custom content, index and rank the content on Google for you hands-free.
We’re able to rank 100s of sites, generating traffic on full automation for B2B and B2C.
The Secret Sauce
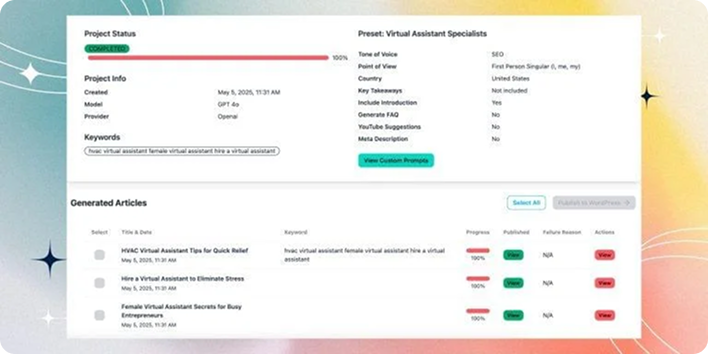
Step #1 – AI article presets that sounds human
Step #2 – Daily blog content across multiple users
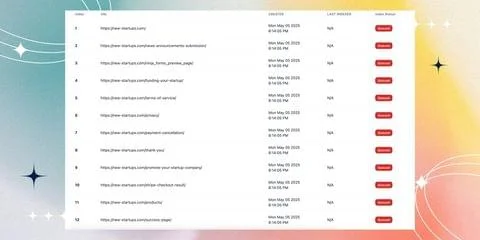
Step #3 – Daily index submissions on Google
This is the reason we’ve built Auto Page Rank
It’s the same software we’ve used to rank sites on position #1 on Google for literally THOUSANDS of keywords.
Auto Page Rank will build custom AI content (that sounds like you), automatically schedule & submit your blog posts daily to Google.
Why This Works So Well? ...
- Blogs That Sound Human
- Natural Posting Behavior
- Automatic Index Submissions
99% Of AI Blogs Don't Even Rank ...
The reason is because most people throw up 1,000 blog posts within 24 hours hoping it'll rank on Google by tomorrow ...
Most gurus will tell you to build 32,000+ articles using AI expecting it to rank on Google the next day …
We’ve figured out the best way to do this is to give it a more natural and ‘believable’ approach.
Here’s the magic formula …
#1 – Post 5-10 blog posts daily in the beginning stages using content that sounds human.
#2 – Then submit your content to Google’s actual API (no blackhat techniques) and do this on a daily basis.
#3 – Google will see that you’re building real legitimate content on a daily basis (30-90+ days).
#4 – Google will then start to trust your website and rank your content.
It’s THAT simple …
Made For B2C Or B2B Traffic ...


How It Works

Is Your Business Stalled & Not Making Any Sales? ...
Without Traffic, You Have:
- No sales
- No leads
- No growth
- No momentum
- No data to optimize
- No brand recognition
With Consistent Website Traffic, You Get:
- A growing email list
- Better brand authority
- Passive leads from Google
- Proof your business is real
- More sales opportunities
- More inquiries and bookings
We Took the Two Hardest Parts of Getting Traffic

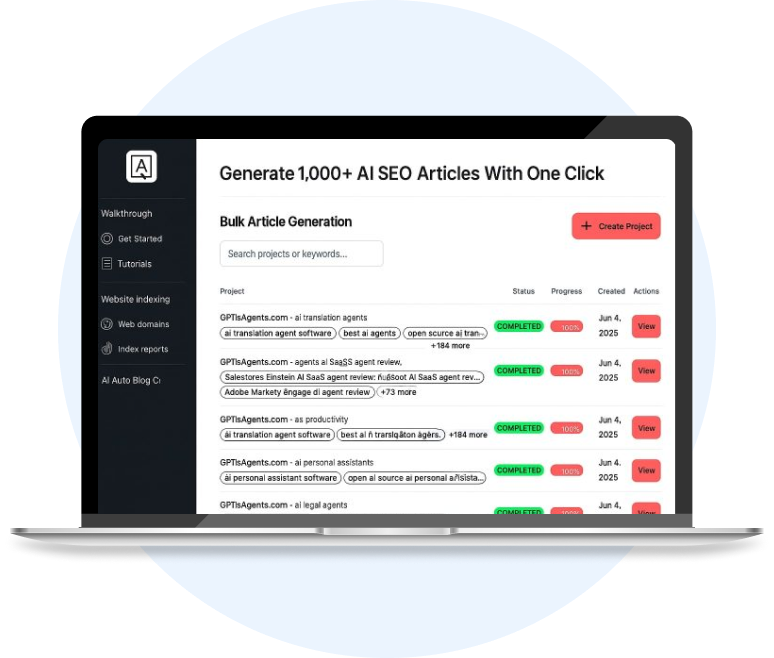
Our Software Writes The Articles For You
Our built-in AI Article Writer creates SEO-optimized blog content based on your niche, keywords, or even just a topic idea. No writers. No agencies. No hours wasted.

We Instantly Index Them on Google
Our system submits your content directly to Google — so your pages get seen fast, often in under 24–48 hours. No more waiting 3 months hoping for traffic.
Question & Answers
Because most businesses either (1) don’t know this type of system exists, (2) don’t understand SEO, or (3) assume paid ads are the only way to get leads. SEO is often seen as slow, expensive, and complicated. Auto Page Rank solves that problem, but it’s still new and most people are stuck in old marketing habits. Those who get in early gain a massive advantage.
This is the limit that Google has placed on each account. This is to avoid spam and abuse of pages getting indexed.
We have seen this happen often. The usual case is that Google has either penalized your website or you have technical issues within your website. We cover this within our tutorials inside of Auto Page Rank and how to recover from this.
Traditional agencies charge $5k+ per month, and you’re locked into long contracts without guaranteed results. Backlinks can cost $100–$300 each and don’t work if you don’t already have strong content. Auto Page Rank bypasses both by building your site into an authority with daily content and automated indexing—at a fraction of the cost.
SEO is not instant. Some customers see rankings in a few weeks; others take a few months depending on niche and competition. The key difference is that with Auto Page Rank, you’re feeding Google daily—so the snowball effect starts earlier and compounds. It’s like investing: the earlier and more consistently you post, the faster you see exponential growth.
Unlike ads, SEO traffic doesn’t disappear the second you stop paying. Your existing articles and rankings will still bring in traffic. However, stopping means you stop building new authority. Competitors who continue will eventually outrank you. Think of it like going to the gym—stop working out, and results slowly fade.
Yes—but it’s time-consuming, inconsistent, and usually costs more. A single good writer may charge $200 per article. At 30 articles per month, that’s $6,000+—without indexing or scheduling included. Auto Page Rank automates all of that: writing, posting, scheduling, and indexing daily. It’s like having a full SEO team running for $250/month.
No. The system is designed to create readable, topical content that establishes authority. We’ve tested it across 50,000+ posts and 100,000+ pages—Google rewards it with real rankings. Unlike spam tools, Auto Page Rank follows a topical map strategy, making the content look like it was planned by a real editorial team.
Even in competitive spaces, there are thousands of untapped keywords and long-tail opportunities. Auto Page Rank’s daily publishing allows you to cover far more ground than competitors who post occasionally. You may not rank for the single hardest keyword immediately, but you’ll capture 100s of smaller keywords that add up to steady leads and sales.
There’s no exact number because it depends on niche, competition, and execution. However, we’ve seen new sites go from 0 to thousands of keywords ranked in 6 months. Unlike ads, traffic here grows over time instead of disappearing when you stop spending. Your site becomes a long-term traffic asset.
Most SEO tools just give you data or analysis—you still have to do all the work (content, posting, indexing). Auto Page Rank does the actual execution daily. It’s not another dashboard—it’s a growth engine. We even use it to rank our own site, so it’s battle-tested in the real world